
In this ever-evolving world of video editing, it is essential to incorporate transformations like dynamics into your content to create attractive and professional looking videos.
One such transformation that has gained immense popularity is Premiere Pro software. warp zoom transition It adds the flair of a unique cinematic effect that easily guides your audience from one scene to the next.
In this comprehensive guide, we’ll dive deep into the world of warp zoom transition Premiere Pro presets and Let us walk you through the entire process step by step, from downloading this preset to adding it to Premiere Pro.
To know how to download it, let us know.
Table of Contents
Understanding the Warp Zoom Transition
Warp zoom transition is a visually captivating effect that distorts the frame to create a visually arresting transition between two clips to add an effective professional touch to the entire editing line, from your blog or travel videos to cinematic interest. It can be widely used in different styles. So let us now move towards understanding the complete method of downloading Warp Zoom Transition Premiere Pro.
Downloading the Warp Zoom Transition Presets
Here are some easy ways to download warp zoom transition Premiere Pro presets to take your editing experience to a higher level with these incredible presets.

Step 1: Go to the home page of our website presets free download.
Step 2: Search the name of your preset on the search button and you will get many collections.
Step 3: Click on any of the collections you see and come to the post on the next page.
Step 4: After scrolling to the last part of that post, you will find the download file.
Step 5: Click on the button of that download file, your file will be downloaded.
Step 6: After downloading the zip file, extract it from your file explorer only then it will work.
So with these above methods you can easily download warp zoom transition Premiere Pro presets, so let us now understand how to apply it in Premiere Pro.
Applying the Warp Zoom Transition Premiere Pro
To apply warp zoom transition in your Premiere Pro, follow the methods given below.
Open Premiere Pro
Search for your Premiere Pro software in your computer or laptop and open it and create a new project.
Import Your Clips
Add your clip to your project and start editing, or go back to your old project.
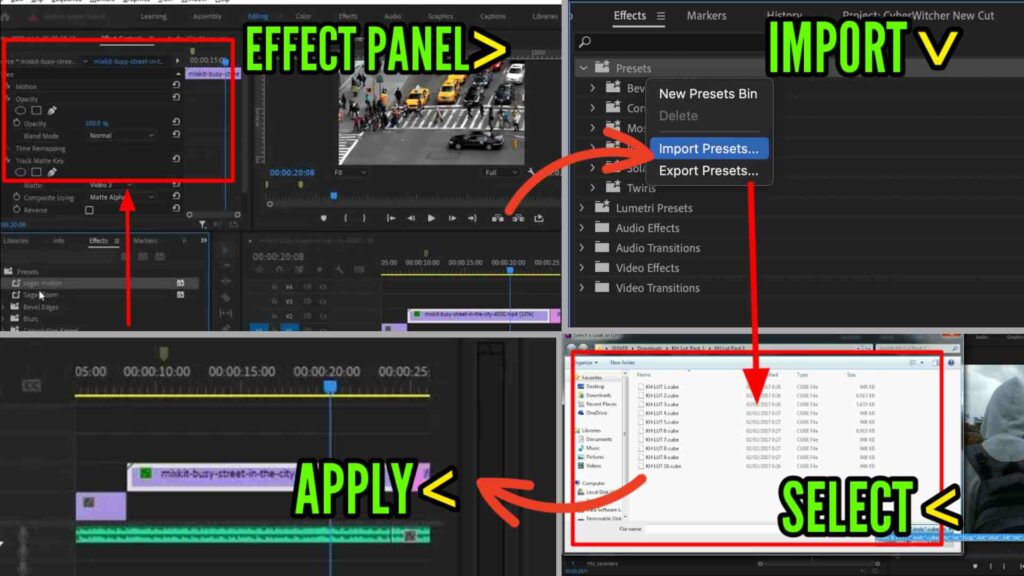
Drag and Drop
To import your downloaded preset, go to the Effects panel, right click on Import preset, select your downloaded preset and add it to your clip by dragging.
Adjust Duration (Optional)
To change the speed of the transition, go to the effect controls and adjust it and also use its duration as per your convenience.
Preview and Fine-Tune
And apart from this, try adjusting it yourself to get some unique look as per your choice, maybe you may come to know some advanced method.
Conclusion:
Finally, Warp Zoom Transition Projects is a very powerful device that can make your video look very important in your video's viewing ability by easily adding this effect to your Premier Pro's project.
You can captivate your audience and keep your content quite high. If you can make experience like experience, then download the presets today, follow our easy installation guide and develop the skills of editing your videos even more.
And comment below to tell us your opinion and share it with your friends, thank you.


Nitesh
Hello, friends My name is Nitesh Mallah and I am the inventor of this blog Presets Free Download. I am 18 years old and I am a part time blogging person and actually if I tell you about myself, I am a student who is currently studying in the first year of graduation. I completed my studies from 1 to 12 and did matriculation and Got a good rank in Inter.