
The Premiere Pro Lumetri Color Panel is a very powerful tool that allows video editors to enhance and balance colours in their photos.
You can take advantage of the Limited Color feature to simplify your editing process and unleash your creativity. In this article, we will show you how to download these Lumetri Color Premiere Pro presets to make your video projects the best.
We will take you through the entire step by step process on implementing and customising and dive deeper into its world. So let’s go. Let’s start by understanding this.
Table of Contents
Understanding Lumetri Color Presets
What are Lumetri Color Presets?
Lumetri Color presets are a pre-built set of Lumetri colour panel settings in Premiere Pro that make it easy for editors to achieve unique looks or styles with just one click, saving time and increasing your workflow efficiency.
Many content creators consider these presets useless because they want the most powerful and unique colour grading feature in their video editing, so let’s understand how to download Lumetri Color Premiere Pro presets.
How to Download Lumetri Color Premiere Pro Presets
Below we have mentioned three ways to download Lumetri colour presets. Follow them and learn it.

Step 1: Visit Our Website
Go to the homepage of our website and you have to search there for your preset which you want to search like the famous colour name is Cinematic, Vintage, Dark, Black and White.
Step 2: Browse and Select
After searching, you will get many results from which you can choose any one and when you click on it, you will come to the next page in which there is a post, you have to scroll to the last one.
Step 3: Download Presets
At the end you will get a download file button, if you click on it then a zip file will be downloaded, definitely extract that file from your file explorer.
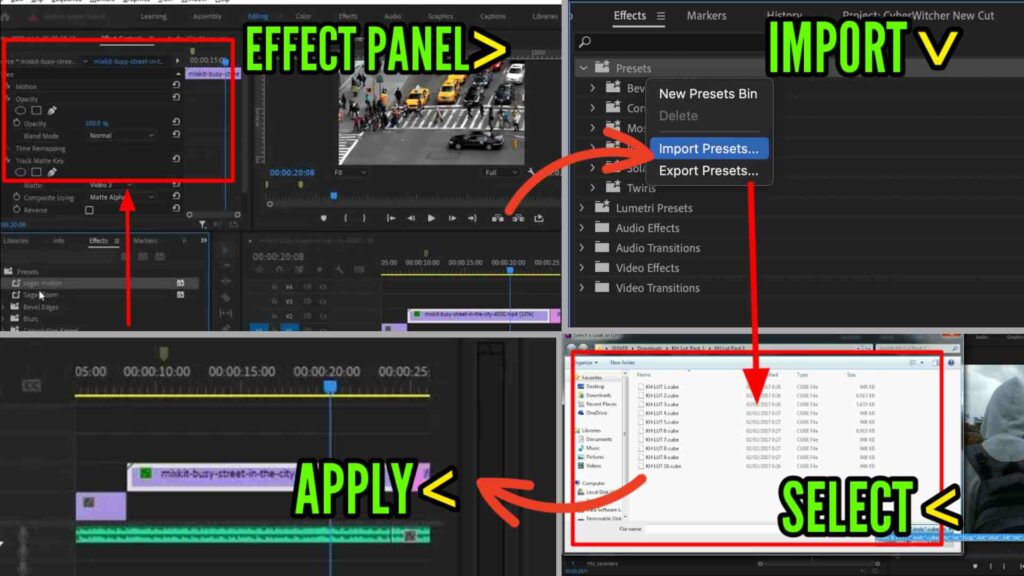
How to Add Lumetri Color Presets to Premiere Pro
To add Lumetri Color presets to your Premiere Pro, follow the simple steps below.
Step 1: Open Premiere Pro
Open your Premiere Pro software on your computer or laptop and create a new project and add your photos or open an old project.
Step 2: Access the Lumetri Color Panel
Go to the Color area and you’ll find the Lumetri Color panel on the right side of the interface. If it’s not visible you can add it by going to the Window menu.
Step 3: Import Presets
Click on Color Wheels & Match Time in the Lumetri Color panel. Locate Creative Experiences where you will find the option to import presets. Click on that and import the Lumetri file that you downloaded earlier.
Step 4: Apply Preset
Once the preset is imported, the Lumetri color preset will appear in the creative experience. To apply the preset to your photos, simply click above the priest’s name. Premiere Pro will immediately apply the colour grading settings to your photos.
Pro Tips: Enhancing Your Color Grading Workflow
Below are some of the best tricks for you to improve the Lumetri Color Premiere Pro presets that all editors do.
Customising Lumetri Color Presets
While the presets provide a very simple solution, don’t hesitate to customise them to better suit your specific photos.
Try adjusting the settings in the Lumetri Color panel to get the perfect look for your project.
How To Remove Lumetri Color In Premiere
To remove presets in Lumetri Color in Premiere Pro, you have to go directly to the Effect Controls panel and there you have to find which preset you applied and remove it by right clicking or pressing the Backspace button on the keyboard. Have to cut it.
How To Save Lumetri Color Preset Premiere
After customising the Lumetri colour settings, save your preset for future use. Save the preset to your file by clicking the three dots next to its name in the Limited Color panel.
Conclusion
Finally, mastering Lumetri color in Premiere Pro opens up new creative potential for video editors. By using free Lumetri colour presets and following our step-by-step guide, you can take your colour grading experience even further.
And you can get a much better look in your projects. Add Limited Color to your Premiere Pro workflow forever for professional grade results and use it. Do comment below to let us know your opinion. Thank you.


Nitesh
Hello, friends My name is Nitesh Mallah and I am the inventor of this blog Presets Free Download. I am 18 years old and I am a part time blogging person and actually if I tell you about myself, I am a student who is currently studying in the first year of graduation. I completed my studies from 1 to 12 and did matriculation and Got a good rank in Inter.